Ejemplo 3
Antes de empezar
ToDo... Hablar un poco sobre estas...
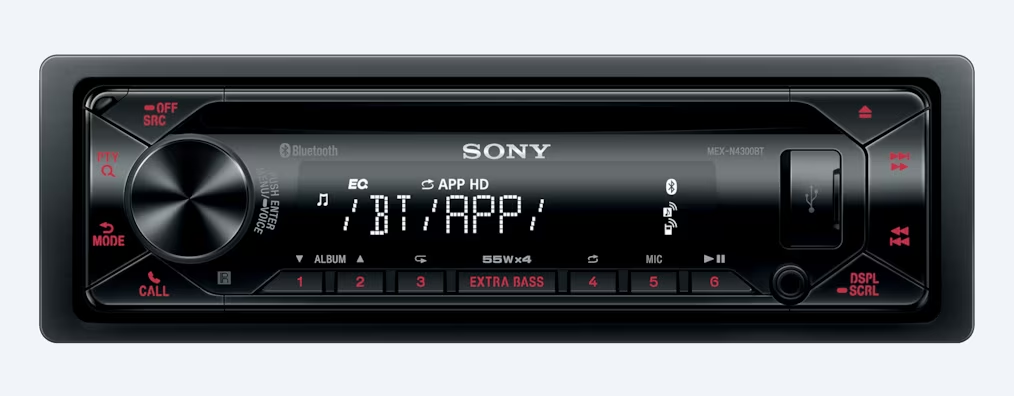
Las siguientes figuras muestran casos de uso de encoders rotativos:
-
Acceso al menu de control de dispositivos como impresoras 3d:
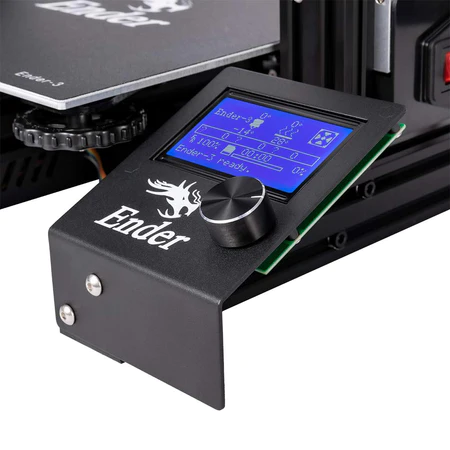
-
Perilla de control de radios de los carros
Enunciado
El siguiente programa lo que hace es...
Hardware
Componentes
| # | Elemento | Cantidad |
|---|---|---|
| 1 | Placa de desarrollo ESP32 | 1 |
| 2 | Rotary encoder (37 sensor Kid de Elegoo) | 1 |
Esquemático
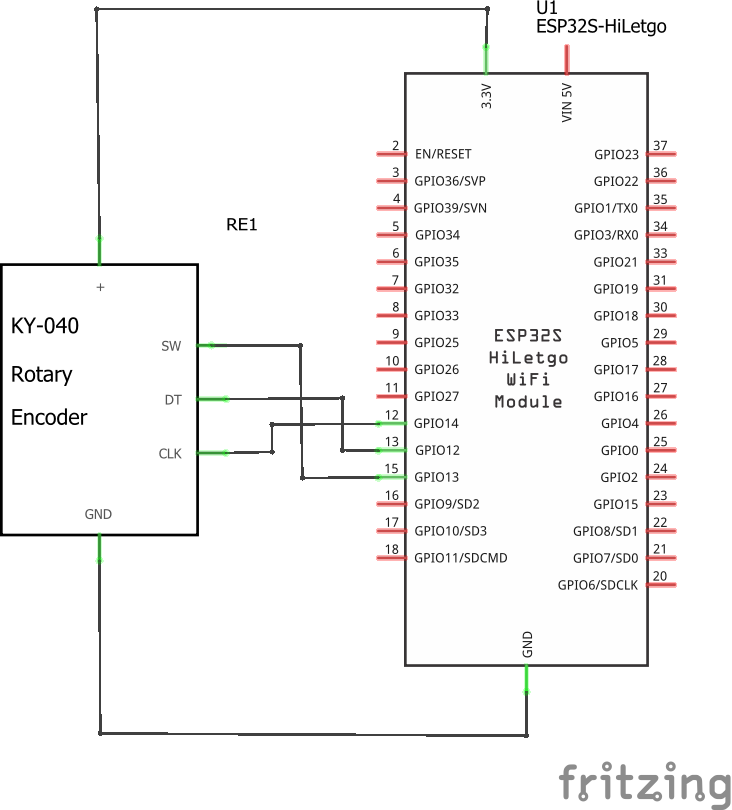
A continuación se muestra esquematico del circuito:
Conexion
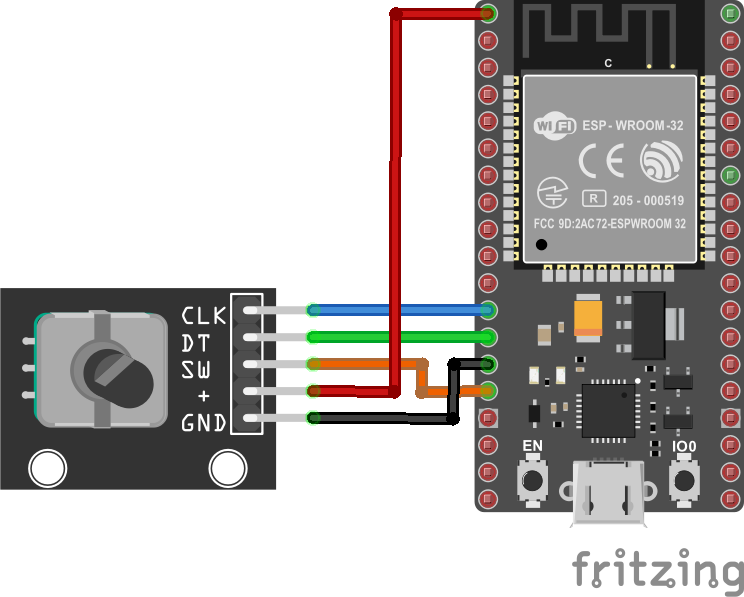
A continuación se muestra el diagrama de conexión:
Sofware
La diferentes implementaciones realizadas se muestran a continuación:
- Caso 1 - Implementación por polling
- Caso 2 - Implementación por interrupciones
- Caso 3 - Programa mejorado usando interrupciones
Caso 1 - Implementación por polling
En esta implementación se puede estudiar analizando la simulación online (link)
Código
#include <Arduino.h>

/* ---- Pines I/O ---- */

// Rotary encoder Encoder (I)
#define ENCODER_CLK 14
#define ENCODER_DT  12
#define ENCODER_SW  13
#define DEBUG 1

// Constantes
const char MAX_PUSH_TIME = 50;

// Variables aplicacion
unsigned char counter = 0;       // Brillo led integrado
int lastClk = HIGH;              // Valor anterior señal CLK
long int resetLastChanged = 0;   // cambio reset

/* ---- Inicialización ---- */
void setup() {
  // Inicializacion serial
  Serial.begin(115200);

  // Inicializacion I/O
  pinMode(LED_BUILTIN,OUTPUT);
  pinMode(ENCODER_CLK, INPUT);
  pinMode(ENCODER_DT, INPUT);
  pinMode(ENCODER_SW, INPUT_PULLUP);

  // Impresion en el monitor serial
  #if DEBUG
    Serial.print("Counter: ");
    Serial.println(counter);
  #endif

}

/* ---- Loop infinito ---- */
void loop() {
  // Chequeo del reset presionado por un tiempo mayor de MAX_PUSH_TIME
  if (digitalRead(ENCODER_SW) == LOW && millis() - resetLastChanged > MAX_PUSH_TIME) {
    resetLastChanged = millis();
    counter = 0;
    #if DEBUG
      Serial.print("Counter: ");
      Serial.println(counter);
    #endif
    analogWrite(LED_BUILTIN,counter);
  }

  // Actualizancion del brillo
  int newClk = digitalRead(ENCODER_CLK);
  if (newClk != lastClk) {
    // There was a change on the CLK pin
    lastClk = newClk;
    int dtValue = digitalRead(ENCODER_DT);
    if (newClk == LOW && dtValue == HIGH) {
      // Aumento brillo
      counter++;
      #if DEBUG
        Serial.print("Counter: ");
        Serial.println(counter);
      #endif
    }
    if (newClk == LOW && dtValue == LOW) {
      // Disminución brillo
      counter--;
      #if DEBUG
        Serial.print("Counter: ");
        Serial.println(counter);
      #endif
    }
    analogWrite(LED_BUILTIN,counter);
  }
}
Test
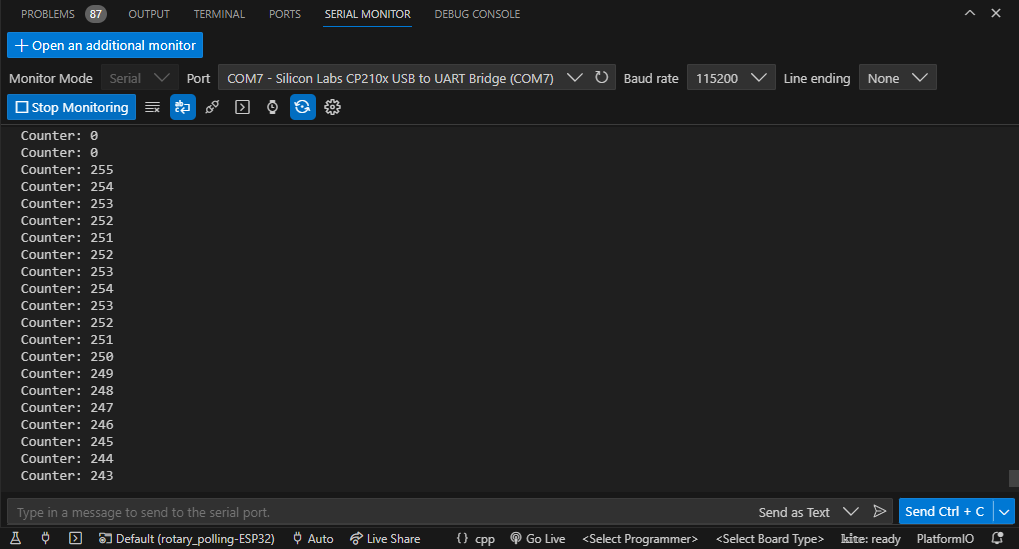
La salida en el monitor serial de platformio se muestra a continuación:
Caso 2 - Implementación por interrupciones
En esta implementación por interrupciones se puede analizar ejecutando la siguiente simulación online (link)
Código
#include <Arduino.h>

/* ---- Pines I/O ---- */

// Rotary encoder Encoder (I)
#define ENCODER_CLK 14
#define ENCODER_DT  12
#define ENCODER_SW  13
#define DEBUG 1

// Constantes
const char DEBOUNCE_TIME = 50;

// Variables aplicacion
volatile unsigned char counter = 0;       // Brillo led integrado
int valClk = HIGH;
int dtValue = HIGH;
long int clkLastChanged = 0;     // cambio clk
long int resetLastChanged = 0;   // cambio reset

// Reset del brillo
void resetEncoder() {
  if (digitalRead(ENCODER_SW) == LOW && millis() - resetLastChanged > DEBOUNCE_TIME) {
    resetLastChanged = millis();
    counter = 0;
  }
}

// Actualizancion del brillo
void updateEncoder() {
  if ((millis() - clkLastChanged) < DEBOUNCE_TIME)  // debounce time is 50ms
    return;
  dtValue = digitalRead(ENCODER_DT);
  if (dtValue == LOW) {
    // Serial.println("DOWN");
    counter--;
  }
  else {
    // Serial.println("UP");
    counter++;
  }
  clkLastChanged = millis();
}

/* ---- Inicialización ---- */
void setup() {
  // Inicializacion serial
  Serial.begin(115200);

  // Inicializacion I/O
  pinMode(LED_BUILTIN,OUTPUT);
  pinMode(ENCODER_CLK, INPUT);
  pinMode(ENCODER_DT, INPUT);
  pinMode(ENCODER_SW, INPUT_PULLUP);

  attachInterrupt(digitalPinToInterrupt(ENCODER_CLK), updateEncoder, CHANGE);
  attachInterrupt(digitalPinToInterrupt(ENCODER_SW), resetEncoder, CHANGE);

  // Impresion en el monitor serial
  Serial.print("Counter: ");
  Serial.println(counter);
}

/* ---- Loop infinito ---- */
void loop() {
  // Chequeo del reset presionado por un tiempo mayor de MAX_PUSH_TIME
  analogWrite(LED_BUILTIN,counter);
  Serial.print("Counter: ");
  Serial.println(counter);
  delay(100);
}
Test
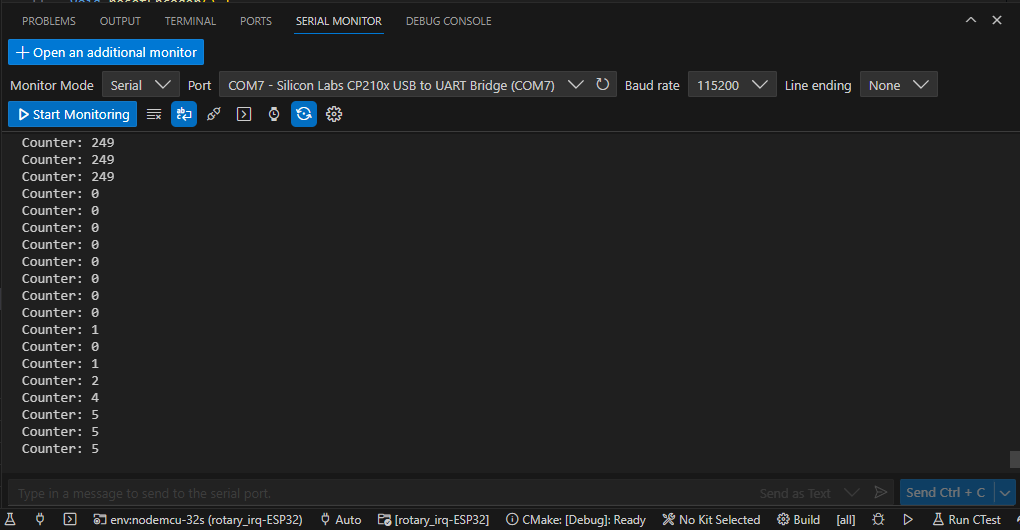
La salida en el monitor serial se muestra a continuación:
Caso 3 - Programa mejorado usando interrupciones
La implementación de este código se muestra a continuación (Simulación (link))
Código
#include <Arduino.h>

/* ---- Pines I/O ---- */

// Rotary encoder Encoder (I)
#define ENCODER_CLK 14
#define ENCODER_DT  12
#define ENCODER_SW  13
#define DEBUG 1

// Constantes
const char DEBOUNCE_TIME = 50;

// Variables aplicacion
unsigned char counter = 0;       // Brillo led integrado
int valClk = HIGH;
int dtValue = HIGH;
long int clkLastChanged = 0;     // cambio clk
long int resetLastChanged = 0;   // cambio reset

// Reset del brillo
volatile byte SW_EVENT = LOW;
volatile byte CKL_EVENT = LOW;
volatile byte PRINT_EVENT = LOW;

hw_timer_t *timer_100m = NULL;       // H/W timer

/* ---- Interrupt handlers ---- */

void ARDUINO_ISR_ATTR event_print(){
  PRINT_EVENT = HIGH;
}

void event_sw() {
  SW_EVENT = HIGH;
}

void event_clk() {
  CKL_EVENT = HIGH;
}

/* ---- Funciones ---- */

// Reset encoder
void resetEncoder() {
  if (digitalRead(ENCODER_SW) == LOW && millis() - resetLastChanged > DEBOUNCE_TIME) {
    resetLastChanged = millis();
    counter = 0;
  }
}

// Actualizancion del brillo
void updateEncoder() {
  if ((millis() - clkLastChanged) < DEBOUNCE_TIME)  // debounce time is 50ms
    return;
  dtValue = digitalRead(ENCODER_DT);
  if (dtValue == LOW) {
    // Serial.println("DOWN");
    counter--;
  }
  else {
    // Serial.println("UP");
    counter++;
  }
  clkLastChanged = millis();
}

/* ---- Inicialización ---- */
void setup() {
  // Inicializacion serial
  Serial.begin(115200);

  // Inicializacion I/O
  pinMode(LED_BUILTIN,OUTPUT);
  pinMode(ENCODER_CLK, INPUT);
  pinMode(ENCODER_DT, INPUT);
  pinMode(ENCODER_SW, INPUT_PULLUP);

  // Inicializacion de interrupciones externas
  attachInterrupt(digitalPinToInterrupt(ENCODER_CLK), event_clk, CHANGE);
  attachInterrupt(digitalPinToInterrupt(ENCODER_SW), event_sw, CHANGE);

  // Inicializacion del timer
  timer_100m = timerBegin(0, 80, true);
  timerAttachInterrupt(timer_100m, &event_print, true);
  timerAlarmWrite(timer_100m, 100000, true);
  timerAlarmEnable(timer_100m);

  // Impresion en el monitor serial
  Serial.print("Counter: ");
  Serial.println(counter);
}

/* ---- Loop infinito ---- */
void loop() {
  // Evento reset
  if (SW_EVENT == HIGH) {
    // Serial.println("Debug: Reset event");
    resetEncoder();
    analogWrite(LED_BUILTIN,counter);
    SW_EVENT = LOW; // No olvidar (atencion del evento)
  }
  // Evento de actualización del contador
  if (CKL_EVENT == HIGH) {
    // Serial.println("Debug: Update event");
    updateEncoder();
    analogWrite(LED_BUILTIN,counter);
    CKL_EVENT = LOW; // No olvidar (atencion del evento)
  }
  // Evento para la impresion en pantalla
  if (PRINT_EVENT == HIGH) {
    Serial.print("Counter: ");
    Serial.println(counter);
    PRINT_EVENT = LOW; // No olvidar (atencion del evento)
  }
}
Test
Queda pendiente capturar la salida...
Referencias
- https://www.upesy.com/blogs/tutorials/rotary-encoder-esp32-with-arduino-code
- https://circuitdigest.com/microcontroller-projects/esp32-timers-and-timer-interrupts
- https://www.electronicwings.com/esp32/esp32-timer-interrupts
- https://deepbluembedded.com/esp32-timers-timer-interrupt-tutorial-arduino-ide/
- https://esp32io.com/tutorials/esp32-rotary-encoder
- https://github.com/igorantolic/ai-esp32-rotary-encoder
- https://www.upesy.com/blogs/tutorials/rotary-encoder-esp32-with-arduino-code
- https://www.arduino.cc/reference/en/libraries/ai-esp32-rotary-encoder/
- https://electricdiylab.com/how-to-connect-optical-encoder-with-esp32/
- https://esp32tutorials.com/esp32-pulse-counter-pcnt-esp-idf-rotary-encoder/
- https://www.adafruit.com/product/5734