Ejemplo 3a - Medición de temperatura y humedad usando el ESP32 con despliegue en un display LCD
Resumen
Realizar una aplicación muestre la tempetatura y la humedad obtenida con un sensor DHT11 en un display LCD. Se recomienda que haga uso del puerto serial para hacer debug de la aplicación.
Hardware
Componentes
La siguiente tabla muestra los componentes principales del circuito a montar:
| Componentes | Cantidad | Observaciones |
|---|---|---|
| ESP32 | 1 | |
| DHT11 Temperature and Humidity Module | 1 | Disponible en el kit Elegoo (datasheet) |
| LCD 1602 Module | 1 | Disponible en el kit Elegoo (datasheet) |
Esquematico
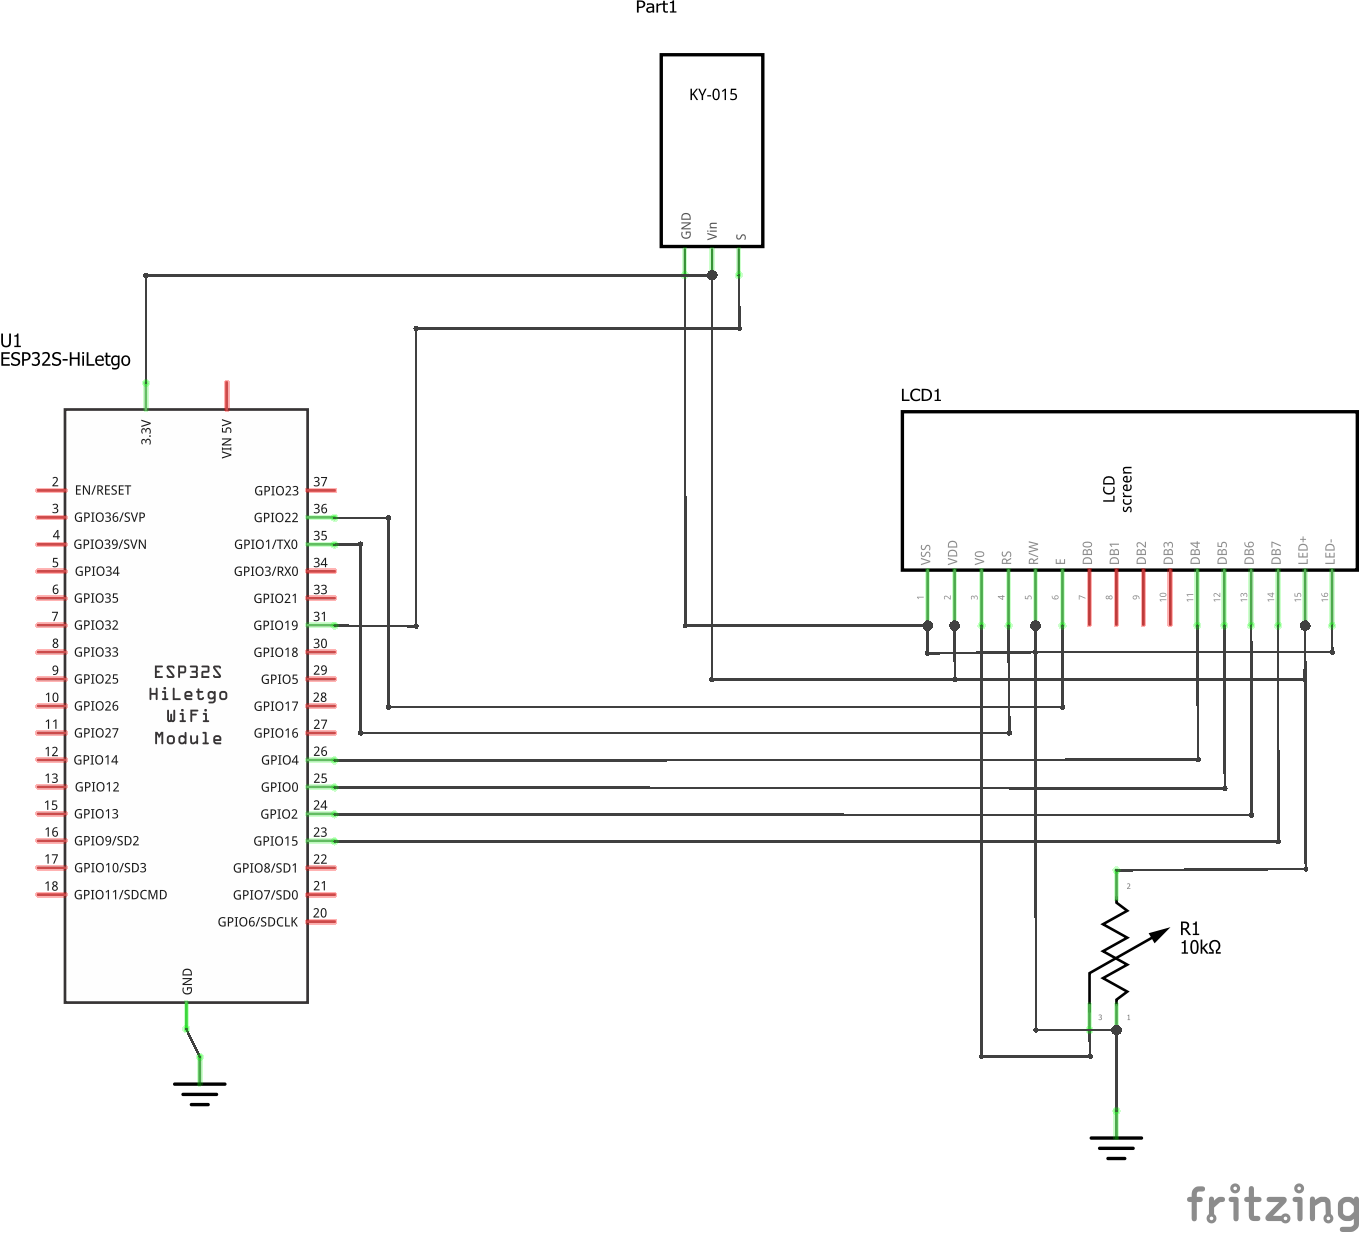
Diagrama de conexión
La conexión entre el sensor el ESP32 y los modulos de hardware externo se muestra a continuación:

Archivo Fritzing
El archivo Fritzing dh11_lcd-esp32.fzz del ejemplo se puede descargar del siguiente [link]
Software
Librerias empleadas
Se agregaron las siguientes librerias (En construcción)
Programa
El programa codificado se muestra a continuación:
// Example testing sketch for various DHT humidity/temperature sensors
// Written by ladyada, public domain

// REQUIRES the following Arduino libraries:
// - DHT Sensor Library: https://github.com/adafruit/DHT-sensor-library
// - Adafruit Unified Sensor Lib: https://github.com/adafruit/Adafruit_Sensor


#include <LiquidCrystal.h>
#include "DHT.h"

#define DHTPIN 19     // Digital pin connected to the DHT sensor

// Uncomment whatever type you're using!
#define DHTTYPE DHT11   // DHT 11
//#define DHTTYPE DHT22   // DHT 22  (AM2302), AM2321
//#define DHTTYPE DHT21   // DHT 21 (AM2301)

// Connect pin 1 (on the left) of the sensor to +5V
// NOTE: If using a board with 3.3V logic like an Arduino Due connect pin 1
// to 3.3V instead of 5V!
// Connect pin 8 of the sensor to whatever your DHTPIN is
// Connect pin 3 (on the right) of the sensor to GROUND (if your sensor has 3 pins)
// Connect pin 4 (on the right) of the sensor to GROUND and leave the pin 3 EMPTY (if your sensor has 4 pins)
// Connect a 10K resistor from pin 2 (data) to pin 1 (power) of the sensor

// Initialize DHT sensor.
// Note that older versions of this library took an optional third parameter to
// tweak the timings for faster processors.  This parameter is no longer needed
// as the current DHT reading algorithm adjusts itself to work on faster procs.
DHT dht(DHTPIN, DHTTYPE);

// initialize the library by associating any needed LCD interface pin
// with the arduino pin number it is connected to
const int rs = 22, en = 23, d4 = 4, d5 = 0, d6 = 2, d7 = 15;
LiquidCrystal lcd(rs, en, d4, d5, d6, d7);

void setup() {
  Serial.begin(9600);
  Serial.println(F("DHTxx test!"));
  dht.begin();

  // set up the LCD's number of columns and rows:
  lcd.begin(16, 2);
  // Print a message to the LCD.
  lcd.print("LCD Ready!");
}

void loop() {
  // Wait a few seconds between measurements.
  delay(1000);

  // Reading temperature or humidity takes about 250 milliseconds!
  // Sensor readings may also be up to 1 seconds 'old' (its a very slow sensor)
  float h = dht.readHumidity();
  // Read temperature as Celsius (the default)
  float t = dht.readTemperature();
  // Check if any reads failed and exit early (to try again).

  // Print readings using the serial port
  if (isnan(h) || isnan(t)) {
    Serial.println(F("Failed to read from DHT sensor!"));
    return;
  }
  Serial.print(F("Humidity: "));
  Serial.print(h);
  Serial.print(F("%  Temperature: "));
  Serial.print(t);
  Serial.println(F("°C "));

  // Print readings using the lcd
  lcd.clear();
  //Choosing the first line and row
  lcd.setCursor(0,0);
  //Typing Humedad:   to the first line starting from the first row
  lcd.print("Humedad: ");
  //Typing the humidity readings after "Humedad: "
  lcd.print(h);
  lcd.print("%");
  lcd.setCursor(0,1);
  //Typing Temperatura:   to the first line starting from the first row
  lcd.print("Temp: ");
  //Typing   the temperature readings after "Temperatura: "
  lcd.print(t);
  lcd.print((char)223); // displaying degree symbol (°).
  lcd.print("C");
}
Test de la aplicación
En construcción...
Simulación online
La simulación del programa descargado se encuentra en ...)