Ejemplo 4 - ESP32 Thing Hookup Guide
Descripción
Este ejemplo es tomado de la sección Arduino Example: WiFi (link) del tutorial ESP32 Thing Hookup Guide (link).
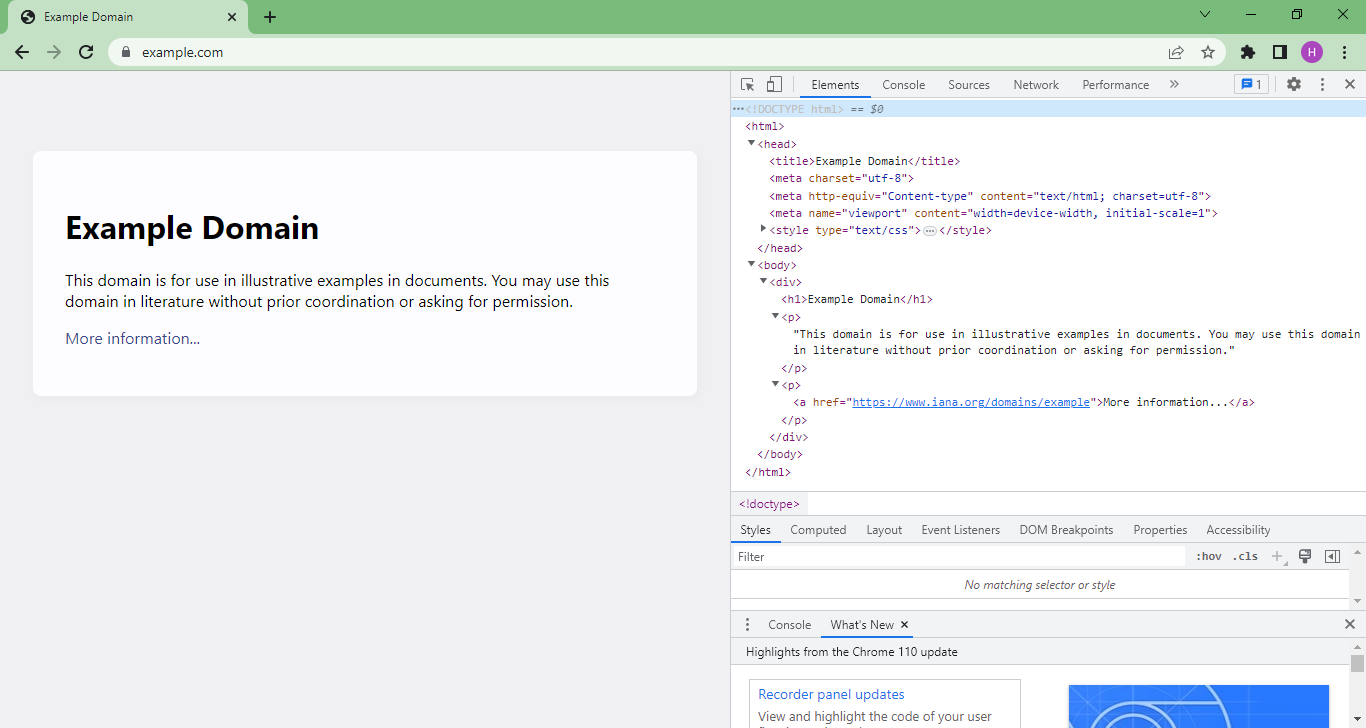
En este ejemplo, se usa la libreria WiFi para demostrar como conectar el ESP32 a una red wifi cercana y acceder como cliente, al dominio remoto http://example.com/
Hardware
Componentes
La siguiente tabla muestra los componentes de hardware necesarios para el caso:
| # | Elemento | Cantidad |
|---|---|---|
| 1 | ESP32 | 1 |
| 2 | Pulsador | 1 |
| 3 | Led | 1 |
| 4 | Resistencia de 330 Ohm | 1 |
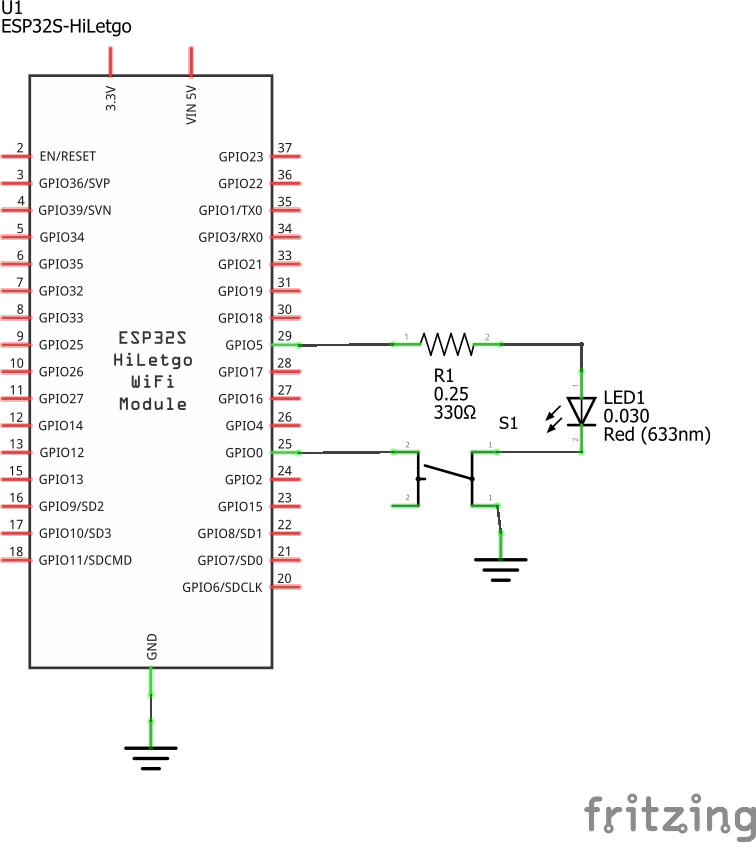
Esquematico
El esquematico de este sistema se muestra a continuación:
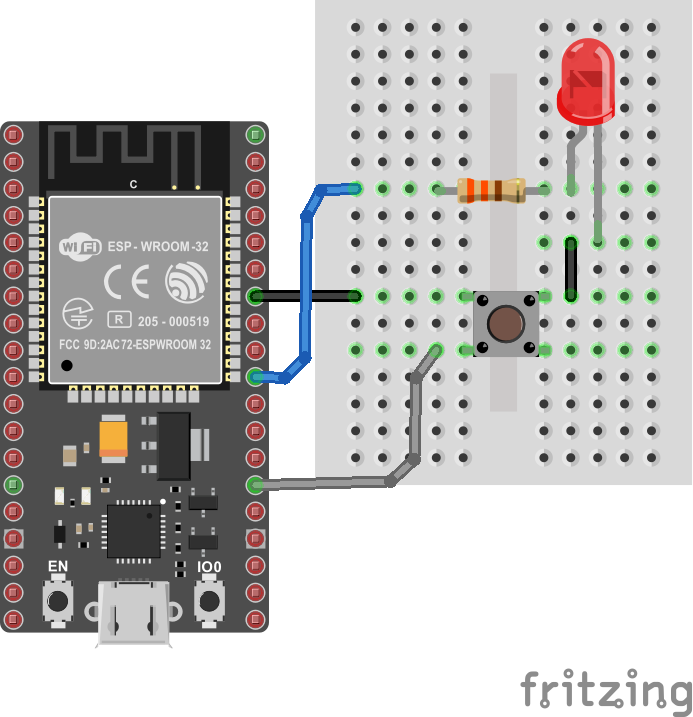
Conexiones
El diagrama de conexión se muestra a continuación:
Archivo Fritzing
El archivo Fritzing ejemplo4.fzz del ejemplo se puede descargar del siguiente [link]
Software
El código del ESP32 se muestra a continuación:
#include <WiFi.h>

// WiFi network name and password:
const char * networkName = "YOUR_NETWORK_HERE";
const char * networkPswd = "YOUR_PASSWORD_HERE";

// Internet domain to request from:
const char * hostDomain = "example.com";
const int hostPort = 80;

const int BUTTON_PIN = 0;
const int LED_PIN = 5;

void setup()
{
  // Initilize hardware:
  Serial.begin(115200);
  pinMode(BUTTON_PIN, INPUT_PULLUP);
  pinMode(LED_PIN, OUTPUT);

  // Connect to the WiFi network (see function below loop)
  connectToWiFi(networkName, networkPswd);

  digitalWrite(LED_PIN, LOW); // LED off
  Serial.print("Press button 0 to connect to ");
  Serial.println(hostDomain);
}

void loop()
{
  if (digitalRead(BUTTON_PIN) == LOW)
  { // Check if button has been pressed
    while (digitalRead(BUTTON_PIN) == LOW)
      ; // Wait for button to be released

    digitalWrite(LED_PIN, HIGH); // Turn on LED
    requestURL(hostDomain, hostPort); // Connect to server
    digitalWrite(LED_PIN, LOW); // Turn off LED
  }
}

void connectToWiFi(const char * ssid, const char * pwd)
{
  int ledState = 0;

  printLine();
  Serial.println("Connecting to WiFi network: " + String(ssid));

  WiFi.begin(ssid, pwd);

  while (WiFi.status() != WL_CONNECTED)
  {
    // Blink LED while we're connecting:
    digitalWrite(LED_PIN, ledState);
    ledState = (ledState + 1) % 2; // Flip ledState
    delay(500);
    Serial.print(".");
  }

  Serial.println();
  Serial.println("WiFi connected!");
  Serial.print("IP address: ");
  Serial.println(WiFi.localIP());
}

void requestURL(const char * host, uint8_t port)
{
  printLine();
  Serial.println("Connecting to domain: " + String(host));

  // Use WiFiClient class to create TCP connections
  WiFiClient client;
  if (!client.connect(host, port))
  {
    Serial.println("connection failed");
    return;
  }
  Serial.println("Connected!");
  printLine();

  // This will send the request to the server
  client.print((String)"GET / HTTP/1.1\r\n" +
               "Host: " + String(host) + "\r\n" +
               "Connection: close\r\n\r\n");
  unsigned long timeout = millis();
  while (client.available() == 0)
  {
    if (millis() - timeout > 5000)
    {
      Serial.println(">>> Client Timeout !");
      client.stop();
      return;
    }
  }

  // Read all the lines of the reply from server and print them to Serial
  while (client.available())
  {
    String line = client.readStringUntil('\r');
    Serial.print(line);
  }

  Serial.println();
  Serial.println("closing connection");
  client.stop();
}

void printLine()
{
  Serial.println();
  for (int i=0; i<30; i++)
    Serial.print("-");
  Serial.println();
}
Puesta en marcha
Antes de descargar el programa al ESP32, no olvidar modificar las lineas de configuración de acceso al AP:
// WiFi network name and password:
const char * networkName = "YOUR_NETWORK_HERE";
const char * networkPswd = "YOUR_PASSWORD_HERE";
Una vez hecho esto, abrir el monitor serial de acuerdo a la configuración realizada en el programa (115200 para el caso). Si todo esta bien, la salida será como la que se muestra a continuación:
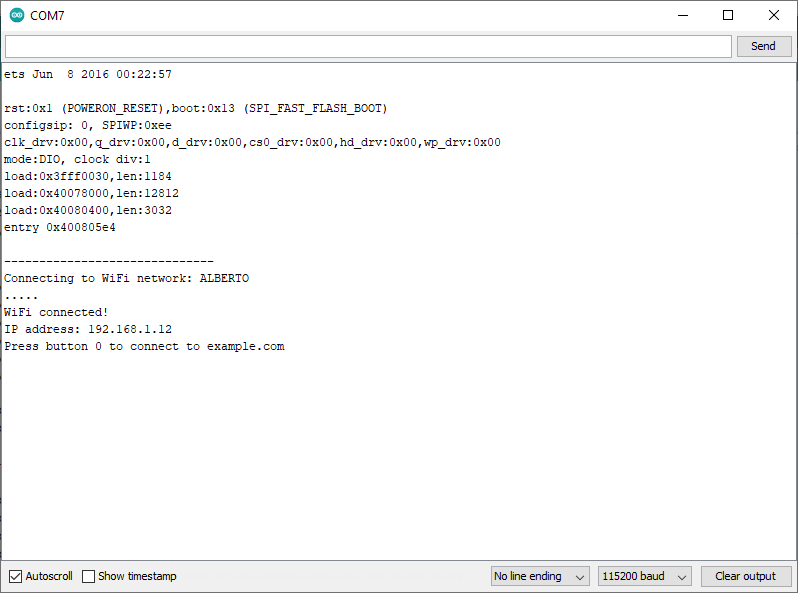
Luego, al presionar el pulsador, entonces la salida en el monitor serial será:
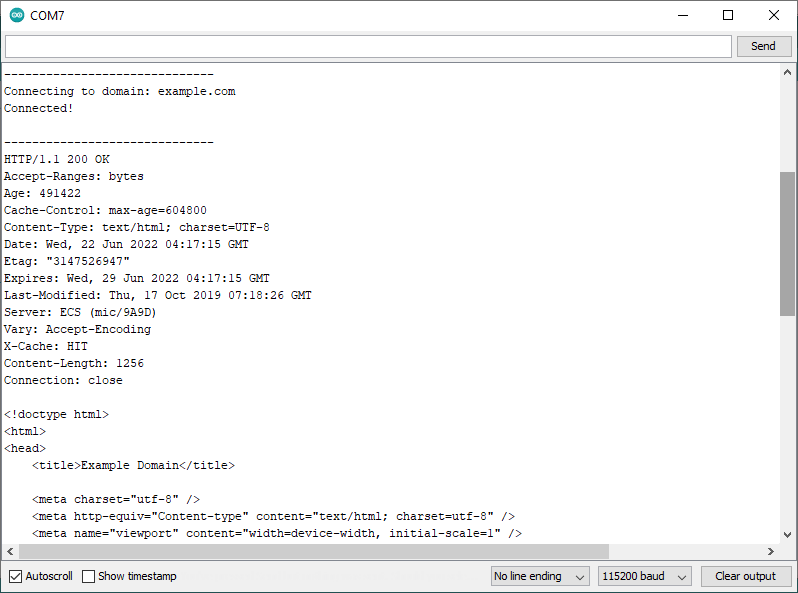
Si se observa la salida serial y se compara al inspecciónar en el navegador la pagina accedida (example.com), se puede observar, que lo que se imprime en el monitor serial es el codigo HTML de la pagina accedida.